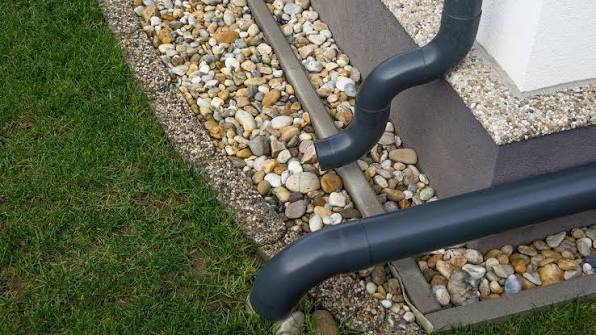
Gutters and downpipes channel rainwater safely away from your home. When it pours in Macarthur, a clogged or missing downpipe can spell trouble. Imagine water threatening to pool around your foundation during a storm – spooky, right?
Whether you’re upgrading an older system or building from scratch, getting advice from experienced Downpipe Installation experts can save you from costly water damage and plenty of future headaches. A properly designed drainage system keeps your home dry and helps you stay ahead of those wild NSW downpours.
In this guide, I’ll walk you through everything you need to know about Downpipe Installation in Australia, from materials to money to maintenance. I’ll keep it laid-back and Aussie-friendly, so grab a cuppa and let’s get started.
Why Downpipes Matter
Ever wondered why those long pipes on the side of your roof matter so much? Downpipes connect your gutters to the ground drainage system. They catch rainwater rushing off the roof and send it into stormwater drains or soakwells. Without them, water would overflow the gutters and spill all over your walls and garden.
That can cause serious damage – like cracking foundations, soggy fences, or even weeping walls inside. Think of a downpipe as a rainwater highway: it keeps water flowing away from your home’s most vulnerable bits.
Downpipes also help prevent stormwater pollution. Rain can carry leaves, dirt, oils, and pollutants from your roof into waterways. A well-installed downpipe can feed water into traps or a rainwater tank instead of right into the gutter. This way, less gunk reaches creeks and rivers.
Campbelltown City Council and other NSW councils stress the importance of keeping stormwater clean – anything washing off our houses ends up untreated in our waterways otherwise. In other words, a tidy downpipe isn’t just good for your home; it’s good for the environment too.
Downpipe Materials & Options
Not all downpipes are made equal. There’s a few popular materials and styles to consider:
- PVC/Plastic: Lightweight and cheap. PVC downpipes (often white or grey) are rust-free and easy to snap together. But they can crack in cold weather or look less classy.
- Colorbond Steel: Very popular in Australia. Comes in many colours to match your roof, and it’s tough. Colorbond doesn’t rust easily and looks sharp. It’s more expensive than PVC, but it lasts longer and suits Aussie style.
- Galvanised Steel: Hot-dip galvanised is sturdy and often cheaper than Colorbond. It has that silvery finish. It can rust over many years, though, especially in coastal areas.
- Copper: For a high-end look, copper downpipes patina to a greenish colour over time. They’re very durable, but also the priciest. Usually reserved for heritage homes or standout designs.
When choosing, think about climate and style. In Macarthur we get sun and storms, so corrosion resistance matters. I like Colorbond because it matches roofs and takes weather well. Also consider shape: round downpipes are classic, but rectangular ones look modern on some homes.
Cost Factors for Downpipe Installation
Installing downpipes typically costs a few hundred dollars per downpipe, plus any extra trench or soakwell work. Here’s what drives the price:
- Materials: PVC is cheapest per metre (maybe $10–$30/m). Colorbond might be $25–$50/m depending on gauge and colour. Copper or premium metals can be much higher.
- Labour: If you call a plumber or roofer, they’ll charge around $100–$150 per hour. Expect to pay at least $200–$300 extra per downpipe for installation. So replacing four downpipes might run from $1,000 to $2,000 total, depending on complexity.
- Access & Height: If the downpipe route is easy to reach, it’s cheaper. A two-storey home or one with tricky access (narrow paths, high roof) will incur more labour or require scaffolding.
- Additional Work: Tying the downpipe into underground drains or adding a soakwell adds cost. A soakwell pit (to soak water into the soil) can be a few hundred dollars on top. If you need to install new stormwater pits or extend drains, budget more.
For a ballpark, many Aussies report paying around $250–$350 per standard downpipe installation, plus about $30–$100 per metre of new gutter (in case you’re updating guttering too). Remember this can vary – always get at least a couple of quotes. I know it’s tempting to cut corners, but DIY drainage can be illegal and dangerous.
In NSW, any stormwater work (like connecting downpipes) actually requires local council approval under Section 68 of the Local Government Act. This is not the kind of job to guess your way through.
Installation Process (Step by Step)
Alright, time to roll up the sleeves. Here’s the general process a pro would follow (and what you should if you’re handy enough to help out):
- Plan the Layout – Identify how many downpipes you need. Aussie building rules say one downpipe per ~12m of gutter. Mark where each pipe will drop from the gutter down to ground. Ideally, they go near valleys or low points in the roof.
- Measure & Cut – The installer will measure the required length of pipe from gutter to ground level (or soakwell inlet). Using a fine-tooth saw or PVC cutter, each downpipe section is cut to size (commonly 90mm diameter for residential).
- Attach to Gutters – The top of the downpipe connects into a spigot outlet on the gutter (a round opening). It’s sealed with silicone to stop leaks. Careful sealing is key: water sneaking out is a leaking roof waiting to happen.
- Secure to Walls – Downpipes are clamped to the wall using brackets. These go every 1–2 metres (or as per manufacturer instructions) to keep the pipe straight and stable. Brackets are usually screwed into wall frames or brickwork. I always make sure they use rust-proof screws, especially in a salty coastal breeze.
- Connect to Drainage – At ground level, the downpipe will either go into a stormwater grate/pit or a soakwell. This step often needs concrete cutting or trench digging. A plumber might core-drill the house slab to take the pipe underground. They’ll fit an elbow or junction piece as needed. Sometimes they install a little debris trap (a simple mesh or leaf catcher) at the pit top.
- Test for Leaks – Finally, we run a hose of water through the gutters and downpipes. Check each joint for leaks, and ensure water exits correctly into the drain or soakwell. Adjust clamps if needed.
Tools commonly used include ladders or scaffolding, holesaws (for drilling through slabs), silicone sealant, clamps, and a level to keep pipes vertical. It’s not rocket science, but accuracy matters. A plumber or guttering specialist will get it right.
A licensed plumber or roofing pro usually handles downpipe work. Look, even though this job seems straightforward, remember that building law in NSW is strict: if it’s a fixed plumbing connection, you often need a licensed tradesperson to do it.
I always double-check if council permits are needed. For example, any new pipe connecting to public stormwater requires council approval (Section 68). It’s not just red tape – councils enforce this to prevent illegal sewer connections or flooding issues.
Best Practices and Maintenance
To get the most out of your downpipes, keep these pointers in mind:
- Maintain Slope: Ensure downpipes drop straight down – no kinks. Gravity should take water smoothly.
- Leaf Guards: If you have trees, use leaf guards in the gutters or at the top of downpipes to prevent blockages. Clogged gutters are the #1 cause of overflow.
- Check Seals: Every 6–12 months, glance at the gutter-to-downpipe joints. Re-seal any cracks with waterproof silicone. A small drip now can lead to rot later.
- Clean Regularly: Give your gutters and pipes a clean-out each year. You can flush them with a hose or use a plumber’s snake. Standing water breeds mosquitoes and rust. I make it part of my spring clean routine.
- Consider a Soakwell: If water pools in your yard, connect downpipes to a soakwell. These underground tanks let water slowly seep into soil, avoiding puddles or storm drains. Soakwells are highly recommended on compacted or clay-heavy sites (common in Macarthur) to prevent surface flooding.
- Use Quality Brackets: Cheap plastic brackets might crack in heat or over-tighten on the pipe. Metal or UV-stable plastic brackets last longer. Ask for stainless screws to avoid rust stains on the wall.
Australian design is all about the finishing touches. A well-painted or colour-matched downpipe can even look like an intentional part of your home’s look. Consider matching downpipe colour to your gutters or trim. It’s a small detail but adds big curb appeal.
Local Regulations & Safety
Being in NSW, we play by NSW rules. As I hinted, any alterations to stormwater lines typically need council sign-off. The NSW Planning Portal mentions that under Section 68 of the Local Government Act 1993, you must get approval for stormwater drainage work.
Practically, that means if your plumber ties a new downpipe into a council pit or street drain, you need that stamp of approval. This keeps everything legal and above board. If in doubt, ring your local council’s building department before starting.
Also, safety first! Downpipe work usually means heights and heavy lifting. Always use stable ladders or scaffolding. Watch for power lines near gutters. Wear gloves when cutting metal pipes (they can be sharp). If you’re hiring, check the person is licensed – in NSW, unlicensed plumbing work is a fineable offence.
Materials Comparison Table
| Material | Pros | Cons | Cost Estimate (AUD) |
|---|---|---|---|
| PVC (Plastic) | Very cheap, easy install | Less durable, can crack | Low ($10–$20/m) |
| Colorbond Steel | Strong, many colours | Mid-priced, can dent | Mid ($25–$40/m) |
| Galvanised Steel | Durable, classic look | Can rust over decades | Mid ($20–$35/m) |
| Copper | Premium look, long-lasting | Very expensive, colour change | High ($50+/m) |
(Note: Prices vary by region and supplier. These are rough guides only.)
Summary
Installing or upgrading downpipes might seem low on the “fun stuff” list, but it’s absolutely critical for a healthy, dry home. To recap: choose a material that suits your style and budget, plan at least one downpipe for every ~12m of gutter, and hire a trusted pro for the job. Don’t forget, in NSW any stormwater/drainage work needs council sign-off (Section 68).
Get those downpipes sorted before the next big Macarthur downpour! If you’re ready to keep your house high and dry, why not talk to local Downpipe Installation experts? I’m here to help you with a free quote or friendly advice. Stay dry, stay sorted!
FAQs
Q: How much does a new downpipe installation typically cost?
A: It depends on materials and complexity, but for a standard home you might spend around $250–$350 per downpipe, plus about $30–$100 per metre of gutter. Extra costs come from site access (e.g. needing a lift) or additional plumbing work (like connecting to a soakwell). Always get a detailed quote.
Q: Can I install a downpipe myself?
A: Technically you could buy the pipes and fix them, but in NSW most plumbing/drainage work must be done by a licensed pro. Even if you’re handy, connecting pipes into the house wall or stormwater system often triggers the need for council approval and a licensed plumber. It’s safer (and legal) to hire an expert.
Q: What is the best material for downpipes in Australia?
A: That depends. Colorbond steel is a popular Aussie choice – it’s strong, comes in many colours, and resists corrosion. PVC is cheaper and rust-free, but not as sturdy. For most modern homes, Colorbond blends well and stands up to weather. Copper looks great but is pricey. Think about your budget and how long you want them to last.
Q: Do I need council permission to connect my downpipe to the stormwater drain?
A: Yes. In NSW, connecting private drainage (like your downpipe) into the public stormwater system requires council approval under Section 68 of the Local Government Act. This usually involves submitting a simple application or form. It might sound like red tape, but it’s there to ensure proper installation and protect neighbours’ homes (no one wants your yard flooding theirs!).